
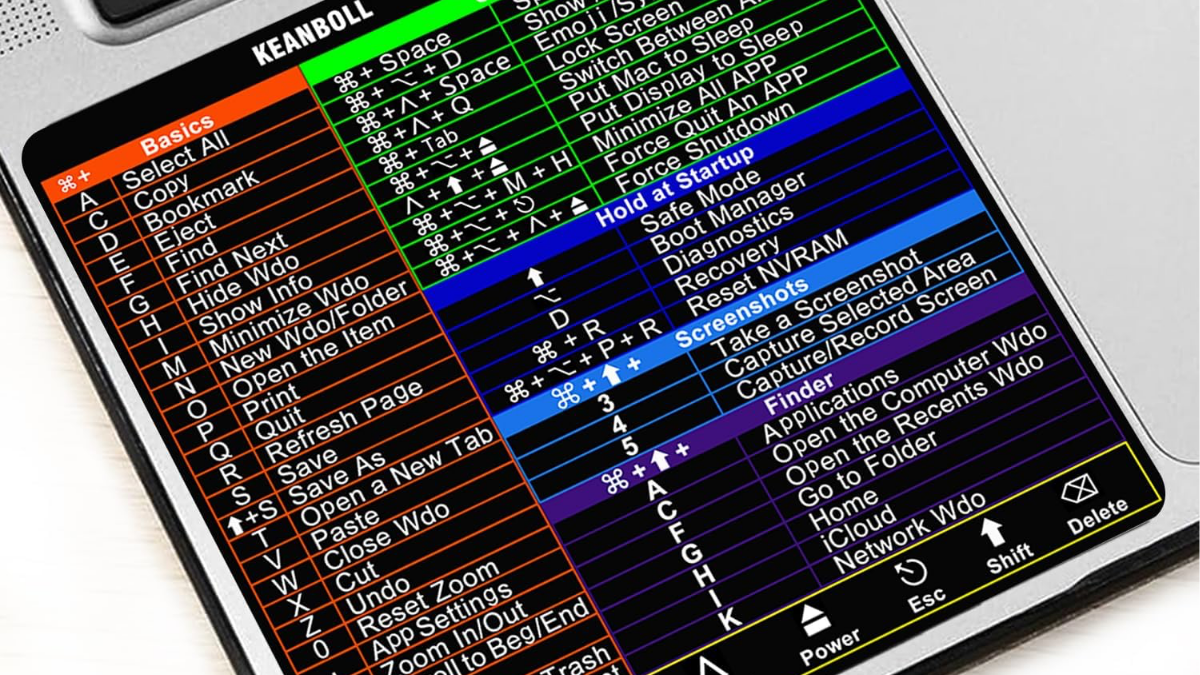
Have you recently purchased a MacBook or are you planning to switch from a Windows laptop to an Apple computer? Learning how to use a MacBook may seem challenging at first, especially if you are unfamiliar with Apple’s macOS operating system. However, once you understand the basic features, settings, and shortcuts, using a MacBook becomes simple, convenient, and enjoyable.
Whether you own a MacBook Air or MacBook Pro, this beginner-friendly guide will teach you everything you need to know about getting started. From setting up your MacBook and navigating the desktop to using applications, managing files, and learning essential keyboard shortcuts, you will discover how to make the most of your device.
1. Getting Started with Your MacBook
Before learning the advanced features, it is important to understand how to turn on and set up your MacBook.
Most modern MacBooks turn on automatically when you open the lid or press a key. If your MacBook does not start, press the Touch ID or power button.
Follow these steps to set up your MacBook:
- Turn on your MacBook.
- Select your preferred language and country.
- Connect to a Wi-Fi network.
- Sign in with your Apple Account or create one.
- Follow the on-screen instructions.
- Set up Touch ID if your model supports it.
- Choose your preferred privacy and security settings.
Once the setup process is complete, your MacBook will take you to the macOS desktop.
2. Understanding the MacBook Desktop
The desktop is the main screen you see when you log in to your MacBook. It allows you to access applications, files, folders, and system settings.
Here are the main parts of the MacBook desktop:
Menu Bar: Located at the top of your screen, the menu bar displays options related to the application you are currently using. It also provides access to Wi-Fi, battery information, sound, and other system controls.
Dock: The Dock is usually located at the bottom of the screen. It provides quick access to frequently used applications such as Safari, Finder, Mail, and Photos.
Finder: Finder is the MacBook’s file management application. You can use it to locate, organise, move, and delete files and folders.
Desktop: This is your main workspace, where you can keep files, folders, and shortcuts for easy access.
Understanding these features will make navigating your MacBook much easier.
3. How to Use the MacBook Trackpad
One of the best features of a MacBook is its Multi-Touch trackpad. It allows you to control your computer using simple finger movements.
Here are some useful trackpad gestures:
- Single-click: Tap with one finger to select an item.
- Double-click: Tap twice to open a file or application.
- Right-click: Click or tap with two fingers to open additional options.
- Scroll: Slide two fingers up or down to move through a webpage or document.
- Zoom in and out: Pinch two fingers together or move them apart.
- Switch between applications: Swipe left or right with three or four fingers, depending on your settings.
- Show Mission Control: Swipe up with three or four fingers to see your open windows and desktops.
You can customise these gestures by going to System Settings > Trackpad.
4. How to Use Applications on a MacBook
Applications are programs that allow you to perform different tasks on your MacBook. macOS includes several built-in applications that are useful for everyday activities.
Some essential MacBook applications include:
- Safari: Browse the internet and visit websites.
- Mail: Send, receive, and organise emails.
- Pages: Create documents, letters, and reports.
- Numbers: Create spreadsheets and manage data.
- Keynote: Design presentations.
- Photos: View, organise, and edit pictures.
- FaceTime: Make video and audio calls.
- Calendar: Manage appointments and events.
- Notes: Write down ideas, reminders, and important information.
To open an application, click its icon in the Dock or use Spotlight Search by pressing Command + Space and typing the application name.
You can also download additional applications from the Mac App Store.
5. How to Use the MacBook Keyboard
The MacBook keyboard has several useful keys that make everyday tasks easier.
If you are switching from Windows, you will notice that MacBooks use the Command (⌘) key instead of the Windows key for many common keyboard shortcuts.
Here are some essential MacBook keyboard shortcuts every beginner should know:
| Keyboard Shortcut | Function |
|---|---|
| Command + C | Copy |
| Command + V | Paste |
| Command + X | Cut |
| Command + Z | Undo |
| Command + A | Select all |
| Command + S | Save |
| Command + F | Find text |
| Command + W | Close the current window |
| Command + Q | Quit an application |
| Command + Tab | Switch between open applications |
| Command + Space | Open Spotlight Search |
| Command + Shift + 3 | Take a full-screen screenshot |
| Command + Shift + 4 | Capture a selected area |
Learning these MacBook shortcuts can save time and make you more productive.
6. How to Connect Your MacBook to Wi-Fi
An internet connection allows you to browse websites, download applications, send emails, and access online services.
To connect your MacBook to Wi-Fi:
- Click the Apple menu in the top-left corner.
- Open System Settings.
- Select Wi-Fi.
- Turn on Wi-Fi if it is disabled.
- Choose your preferred network.
- Enter the Wi-Fi password if required.
- Click Connect.
Once connected, you can use Safari or another browser to access the internet.
7. How to Manage Files and Folders on a MacBook
Learning how to organise files is essential when using a MacBook for work, school, or personal activities.
Finder makes file management simple.
To create a new folder:
- Open Finder.
- Navigate to the location where you want the folder.
- Right-click on an empty space.
- Select New Folder.
- Give your folder a name.
To move a file, drag it into your preferred folder. You can also copy and paste files using Command + C and Command + V.
Your MacBook also includes a Downloads folder, where files downloaded from the internet are usually stored.
For better organisation, create separate folders for documents, pictures, videos, work projects, and personal files.
8. How to Install and Uninstall Applications
One of the easiest ways to customise your MacBook is by installing applications that suit your needs.
To install an application:
- Open the Mac App Store.
- Search for the application you want.
- Select the application.
- Click Get or the displayed download option.
- Authenticate if required and wait for installation.
You can also download compatible Mac applications directly from trusted developers’ official websites.
To uninstall an application:
- Open Finder.
- Select Applications.
- Find the application you want to remove.
- Drag it to the Trash or use the available delete option.
- Empty the Trash if you want to permanently remove it.
Always download software from trusted sources to protect your MacBook from malicious applications.
9. How to Take Screenshots on a MacBook
Screenshots are useful when saving information, sharing problems, or capturing something important on your screen.
MacBooks provide several screenshot options.
- Press Command + Shift + 3 to capture the entire screen.
- Press Command + Shift + 4 to select a specific area.
- Press Command + Shift + 5 to open the screenshot and screen-recording controls.
By default, screenshots are usually saved to your desktop unless you have changed the save location.
10. How to Keep Your MacBook Secure
Protecting your MacBook is important, particularly if you use it for online banking, business, school, or personal activities.
Here are some security tips:
- Use a strong password to protect your account.
- Enable Touch ID if your MacBook supports it.
- Install macOS updates when available.
- Enable FileVault disk encryption.
- Use Find My Mac to help locate your device.
- Avoid downloading applications from suspicious websites.
- Be careful when opening unknown email attachments.
- Back up important files regularly using Time Machine or another trusted backup solution.
These practices can help protect your personal information and keep your MacBook running securely.
11. Useful MacBook Tips and Tricks for Beginners
Once you understand the basics, there are several additional features that can improve your MacBook experience.
Use Spotlight Search: Press Command + Space to quickly find applications, files, documents, and information.
Use AirDrop: Share photos, documents, and other files wirelessly with nearby compatible Apple devices.
Use Split View: Work with two applications side by side to improve multitasking.
Use Siri: Ask Siri questions, set reminders, or perform supported tasks using voice commands.
Use iCloud: Store and synchronise supported files, photos, and other information across your Apple devices.
Use Time Machine: Back up your MacBook so you can recover important files if something goes wrong.
These features can help you work faster and get more value from your MacBook.
12. How to Maintain Your MacBook
Proper maintenance can help keep your MacBook in good working condition.
Consider following these simple maintenance tips:
- Keep macOS updated.
- Clean the screen and keyboard using appropriate cleaning materials.
- Avoid exposing your MacBook to excessive heat or moisture.
- Keep sufficient storage space available.
- Remove applications you no longer use.
- Back up important documents regularly.
- Use a suitable charger and avoid damaging the charging cable.
- Restart your MacBook occasionally to resolve minor software issues.
Taking care of your MacBook can help maintain its performance and extend its useful life.